Tuesday, July 30, 2013

HTML: Tutorial 9 drop down menu's with clickable option and opening websites from drop down menu's

     Alright how are you feeling today? I am feeling great and I am sure you will be too after this tutorial. In the last tutorial we learned how to create a drop down menu. Now we are going to take another step and create another drop down menu but this time when we select an option , you will be able to direct to user to your website of choice!! If you haven't done the last tutorial I suggest you do it before using this tutorial unless you already know how to make a drop down menu.
   Alright open up your text editor and type in this code

<html>
<body>

</body>
</html>

Ok now lets break down this new code in steps. Since this is more "complex" then other subjects we tackled, we will break it down in another manner.
  
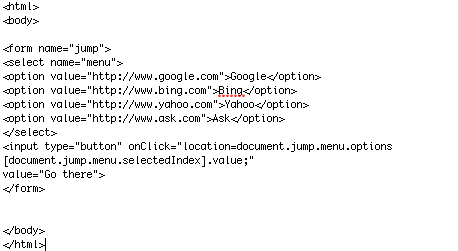
Ok now after reading the explanation carefully go to your test editor and type out this code. 


Now save this file as menulink.html and double click the file to open it. You should be able to click on the menu , select the option you want and then press the go there button to go to the selected website. Your screen should look like this


Now when I first learned this I made mistakes 2-3 times before I got it right.If it didnt work  make sure you typed everything exactly the way you see it. If it got to work Congratulations you have moved up from a beginner to now almost imtermediate. With all that you learned you can make a fun interactive website people will love. Ok there is more to learn comming up!! Your doing such a great job so far!!  Click here to go to Tutorial 10


HTML: Tutorial 8 Drop down menu's

Ok you ready to type , cause this is where it gets a little deep. Don't worry though with me as your guide you will do just fine. Drop down menu's are another cool aspect of websites and blogs. It makes your site more fun and interactive. Drop down menu's save space and make the user have a great experience because they have visual feedback instead of just reading text and filling out forms. Ok lets dive into it !! Set up your basic code 1st...
<html>
<body>

</html>
</html>

Now to make drop down menu's you will be using the <forms> tag and also a new tag called <select name=" "> which means you will be selecting a name from the menu your about to make. Now <option value="android">  means this is one of the drop down menu options and >android<  after that part is what will be displayed on the screen. Ok now type out this code

<html>
<body>


<form action="">
<select name="phones">
<option value="android">android</option>
<option value="iphone">iphone</option>
<option value="windowsphone">windowsphone</option>
<option value="blackberry">blackberry</option>
</select>
</form>

</body>
</html>

Now save it as dropmenu.html and double click on the file, it should look like this after you click on the menu


Alright!! Now with this drop down menu go ahead and really play around with making your own drop down menu. I want you guys to get really comfortable with the code. I know this is alot but its also pretty cool.  Also if you haven't already subscribe so you can get each tutorial as it comes. Alright when your ready head over to the next topic!!  Drop down menu's with links yes I am so excited !!  Click here for tutorial 9


HTML: Tutorial 7 Radio Buttons and Checkboxes

Alright how are you doing there buddy. You have come a long way and learned alot of cool stuff to make your website look awesome and professional. I am proud of you and your accomplishments!! Now we will learn some more cool stuff to add to our websites. Radio buttons and Checkboxes!!
Ok open your text editor and type the basic code
<html>
<body>

</body>
</html>

1st is radio buttons like when you go on a website to sign up and they ask if your male or female. Like lesson 6 we use <form> and <input> but this time the input will look like this  <input type="radio" name="sex" value="male">Male . Now to explain <input type="radio" means we are going to make radio buttons.  Now name="sex" value="male" name=" " is the group the radio button belongs to and value=" " defines what will be submitted to webserver if checked. The name and value will be very important when you have multiple groups of separate radio buttons. At the end of the code see >Male. That means next to the radio box thats the word you will see onscreen.  Ok now type in this code

<html>
<body>

<form>
<input type="radio" name="sex" value="male">Male<br>
<input type="radio" name="sex" value="female">Female
</form>

</body>
</html>

Ok now save your file as radio.html and double click your file. It should look like this


Now note I press the male button if you didn't press anything both would be blank. With radio buttons you can select only one option in each group. If you select male then try to select female , the male will be unselected. Now on to checkboxes. We will use the same file radio.html for both lesson's. Now instead of <input type="radio" it will be checkbox. You see where it says HTML is easy, thats the part after the > meaning thats what you will see on your screen. Now add in the checkbox code after the radio code.

<html>
<body>

<form>
<input type="radio" name="sex" value="male">Male<br>
<input type="radio" name="sex" value="female">Female
</form>

 <form action="">
<input type="checkbox" name="program" value="mycode">HTML is easy<br>
<input type="checkbox" name="program" value="mycode">HTML is hard
</form>


</body>
</html>

Ok now save your file, then double click and it should look like this on your webbrowser.


Alright now your code is looking more like programmers code , confusing to a regular persons eye haha. If your webpage doesn't look similar trust me look over your code carefully and make sure you didnt miss anything. Ok wow you really made it, no longer a beginner after finishing this. Now your coding like a pro and I am proud of you for going through all these lesson's but we got more good stuff comming up for you here .    Click here for the next tutorial

HTML: Tutorial 6 create text fields for users to input names and passwords

       Ok we have gone over alot of great tools to make your website look great. Now we are going to step a little deeper into the elements that make websites more interactive. Today we are going to make text boxes that users can type thier names,emails,and passwords in. Alright you ready? Great lets get it on !!
Go ahead a make a blank text document and name it  Texter.html and place the starting code.
<html>
<body>


</body>
</html>

Good now 1st we are going to make a textbox that a user can input his name or email in.
 The <form action=" "> basically states we are going to input information that will be used in a webserver. The <input="  "> will tell the webpage to make a textbox field which the user can enter his or her information. You let the input command know that your going to let someone write text inside a textbox simply putting the word "text" . Now type this
<html>
<body>

<form action="">
Email:     <input type="text" name="email">
</form>


</body>
</html>

Ok now save your Texter.html file and double click on it. It should look like this


Now go ahead and type in it. Haha that was easy and fun. Now we will make the password portion. Now to make a password you need to change the input code to this <input type="password"  . The reason is so that the website knows to make a circle or asterisk when you put in the code and to use it as a password. Go ahead and add this

<html>
<body>

<form action="">
Email:     <input type="text" name="email"> <br>
Password:  <input type="password" name="password">
</form>


</body>
</html>

Now after typing it in go ahead and double click on your file and it should look like this


Ok now type in the password field and see what happens.  The password field will not display what you typed in but circles or asterisk . If this didnt work look over your code carefully. Also you notice something we didnt talk about <br> . Ok <br> means a break in the line, like when you press return to start in a new line. Alright go ahead and practice this , as we will continue to make more interactive elements to your website. Go to lesson 7    Click here for lesson 7


Monday, July 29, 2013

HTML: Tutorial 5 embed video's in your webpage

  Ok its lesson 5 and its a big one!! We already tackled some of the basic elements that go into making a website, now to make our website even cooler!! Today we are going to learn how to embed video's and set the size we want the video to be. Now this time open up a fresh new page in your text editor and type out the basic's

<html>
<body>


</body>
</html>

Now there are different ways to embed video's. Today we will be using <iframes> to embed video's. Alright the basic code to iframes is this  <iframes src=" put website here" width=" " height= " " </iframes>  . Thats the basic format, now next parts are going to be a little tricky so pay close attention.
Now the youtube link we will be using is this.  http://www.youtube.com/watch?v=9udpuQaaS64
Now will will put this inbetween the src=" youtube link goes here!!  "
Now in order for this to work we need to change the youtube code after we put it in the src=" ".
Now we will change the  watch?  to  embed/    then we will delete the v= . Our youtube link will look like this  http://www.youtube.com/embed/9udpuQaaS64   . Go ahead and type it in your editor and save it as video.html . Look below to make sure your code matches.


<!DOCTYPE html>
<html>
<body>

<iframe src="http://www.youtube.com/embed/9udpuQaaS64" width="480" height="480" </iframes>


</body>
</html>

This is what the final code should look like. Go ahead a click the video.html file and it should look like this on your websrowser.

Please note: It should not take up all the page but display the video with you being able to click on video and watch it play. If this does not work please check your code very carefully.


Alright we learned how to make links,images,and now embed video's. I am proud of you , we have accomplished something major!! Keep going and learning html in our next lesson. Also leave comments or feedback to keep us going.    Click here to go to lesson 6


HTML: Tutorial 4 Make images into links and setting size of images

      Hi there again!! You ready to expand on the knowledge you gained so far. If you have been following along you can open your Learning3.html file in your text editor. If your new copy and paste this code into your text editor.

<html>

<body>

<h1> Learn Links </h1>

<p> How to add links </p>

 <a href="http://www.androidfreegamesapps.forumotion.com">Click here</a>

<p> Now add images <p>

<img src="Mario.png">


</body>
</html>

Now the first lesson will be to set the width and height of your image. Actually this is very easy since you have done most of the code in the previous lesson. In your text editor go to the section where you have your image code. Now after the "Mario.png" go ahead and add width="80" height="80"  your code should look something like this..

<html>

<body>

<h1> Learn Links </h1>

<p> How to add links </p>

 <a href="http://www.androidfreegamesapps.forumotion.com">Click here</a>

<p> Now add images <p>

<img src="Mario.png" width="80" height="80">


</body>
</html>


Now save your file as Learn4.html and double click on your Learn4.html file. After you see the image go back to your Learn4.html file and set the width="20" height="20"  ,ok now  save it again and click on your Learn4.html watch as your image has gotten alot smaller and should look something like this


Ok now as always if it doesn't work comb over your code carefully, common mistakes is to forget the "" after height and width. Now lets turn that image into a link.
1st In the website code delete the >click me<  DELETE ONLY THE WORD CLICK ME NOT THE BRACKETS. 2nd Now type inbetween the brackets that you just deleted click me go ahead and type in the image code <img src"Mario.png" width"40" height"40"> . Your code should now look like this

<html>

<body>

<h1> Learn Links </h1>

<p> How to add links </p>

 <a href="http://www.androidfreegamesapps.forumotion.com"><img src="Mario.png" width="40" height="40"></a>

<p> Now add images <p>

</body>
</html>

Now go ahead and save the file and double click on it. Now go ahead and click on the Mario image and it will take you to another website. If for some reason it didnt work, go over your code slowly to make sure you didn't make any mistakes. Most common mistake people make is >< img scr="  around that area in the code. So now you learned how to make a header,text,set image,set links, and set links in images. Alright you have accomplished alot!! Head over to the next lesson your doing great!! Lesson 5

Click here for lesson 5


HTML: Tutorial 3 images

  Ok we now know how to make a website with heading,text,and links. What other elements are we missing? Images!! A website with text and links would be boring, so lets now go make our website a little more exciting.
Use the file Learn2.html for this project , if you don't have the file then open your text editor and text in this basic code.
<html>
<body>


</body>
<html>
Now the code to add images is  <img src""> The name of the image you will be using will be placed inbetween the " " brackets. Ok for this tutorial just right click and download this image rename it Mario.png


Yes we will be using super mario for this excercise. Now download the image, make sure you named it Mario.png and place the image in the same folder as your html project. Now type this code
<html>

<body>

<h1> Learn Links </h1>

<p> How to add links </p>

 <a href="http://www.androidfreegamesapps.forumotion.com">Click here</a>
<p> Now add images <p>


<img src="Mario.png">


</body>
</html>


Save your project as Learn3.html  ,now your project should look like this


Code breakdown:The name of the image file was Mario.png . You put the Mario.png between the " " brackets. So the code for the image was <img src="mario.png"> .

Ok congratulations now you can make a good looking website. You have completed 3 lessons already and you haven't even broken a sweat yet. Next we will expand on how to make an image the size you want and how to make an image a link  Lesson 4   Click here for lesson 4


HTML : Tutorial 2 Links

 Now that we learn the basics to building a heading and paragraph. Now that we covered the basic's of heading and paragraph , lets look into another basic component that every website has links. The web is built on inward and onward links that connect individual webpages that combine into the internet. Ok enough talk lets start!!
As always start out with the basic template

<html>
<body>

</body>
</html>

Now lets add a header and a small paragraph. Also we will add a link which I will explain how it works after you have typed it and save the file as learn2.html .

<html>
<body>
<h1> Learn Links </h1>

<p> How to add links </p>

<a href="http://www.androidfreegamesapps.forumotion.com">Click here</a>

</body>
</html>
Now double click on the Learn2.html after you saved it. It should look like this

Notice the link is high lighted in purple and when you click on it, you get taken to a new page. If it didn't work just comb over your code very carefully to make sure you typed it right and you didnt forget to close tags <> </> . Now to explain the code.
<a href=""  tells the browser your putting in a link. The link goes inbetween the " " brackets. Now after you put the link inbetween the " " brackets you type > to close that portion. Now after the > you type the words that you want to show up in place of the link on the screen. After you place the words then you close the tags by putting </a> .

<a href=" the website goes here" >   thats the 1st part that declares the website you want to point to.
>your text here</a>                           This is were you declare what text you want in place of the link. Later on I will teach you how to put an image instead of a text. Thats it great job and if you didn't understand anything please leave a comment or read the lesson over.    Lesson 3 here   Click here for lesson 3


Sunday, July 28, 2013

Introduction to HTML:Tutorial 1

Hi I welcome you to the HTML learning center. I know how hard it is to find solid resources to learn HTML,CSS,Javascript,and HTML5 . I remember searching hard finding a small tutorial here or there but not fully understanding what I was learning. Thats why I decided to make these tutorials, so not only do you learn what the code is but how it works.
    What is HTML? HTML is the markup language that powers internet browsers. What you see on a webpage and how you interact with it. Most webrowser technology is a combination of HTML,CSS,Javascript, and HTML5.
    Why should I learn HTML 1st? HTML is the starting point and if you do not understand HTML 1st learning the other languages CSS,Javascript,and HTML 5 will be very difficult.HTML is the wrapper for Javascript and CSS so learning HTML is vital.
    OK when can we start? Right now!!

What do I need? If your on a Mac text wrangler will be your best bet. You can use text edit but some modifications will be needed.

If your on a PC then notepad++ will be your best option. Both are free downloads, after you have downloaded the editor you needed, proceed to lesson one.


Open your text editor and type this

<html>
<body>

</body>
</html>


This is the start point for any HTML program. The <html> tag on top points to the browser telling the browser that this is a HTML program. The <body> tag is where the script for you program belongs. In the future we will be adding other starting tags but for now this is all we need. If you notice the <html> on top but on the bottom its </html>. The  /  inside the brackets means the closing of a statement. You will also notice the body tag has it also. Now lets continue and type in the rest...

<html>
<body>

<h1>My first HTML program </h1>
<p>Hello World</p>


</body>
</html>

Now the <h1>
 tag represents the header file. This will show up on your screen in bold letters. The header file tells the web search engine that's the title of your topic. The <p>  is your paragraph tag. This tells the start point of your paragraph. Now go ahead and save the file as

Learn1.html

After saving the file double click the file and it will open up your webrowser. It should look like this.


Ok this is your 1st lesson, great job!! I hope you understood not only the code but why it was used. Practice a little more on your own before heading to part 2.   Click here for part 2